Requirements
The software is supplied with DC series controller that covers the hardware requirements. The user should not run additional applications in the background when the software is running to avoid performance issues.
To use the software, a display with resolution at least Full HD (1920×1080) is required. Keyboard and pointing device (mouse) is required. A mouse with scroll wheel and scroll wheel button is recommended.
Operating system
The software runs on Raspberry Pi OS installed on the DC series controller / computer.
The display must be connected to the controller before powering it up.
DC series controller is supplied with installed and configured system and Dyno2 software placed on desktop, ready to run.
Dyno2 software works only on custom, prepared, system. It won’t run on a clean Raspberry Pi OS installation.
Doing system updates is not recommended, as it could break correct Dyno2 software operation.
Power must not be cut off when the software is running or during any data write operation. It could lead to data corruption. My experiments prove that powering down the device, with the operating system running idle, doesn’t have any negative consequences. Despite that, it is suggested to shut down the operating system before powering down the device.
If the operating system gets damaged, the whole system image can be downloaded from our website: https://api.perek.it/dyno2/updates/
Printer
To avoid problems with drivers, use a printer that supports IPP Everywhere driverless printing. Alternatively check if the printer you’re going to buy is confirmed to be working with Raspberry Pi OS.
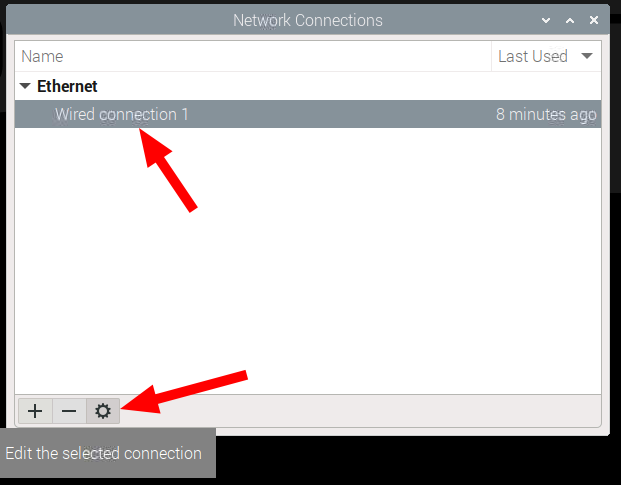
Ethernet cable connection
When DC series device is shipped, default LAN configuration is static IP address: 192.168.1.11 that may not be suitable for every network. To connect the device to LAN network through Ethernet cable, it is usually required to set IP settings to automatic DHCP.
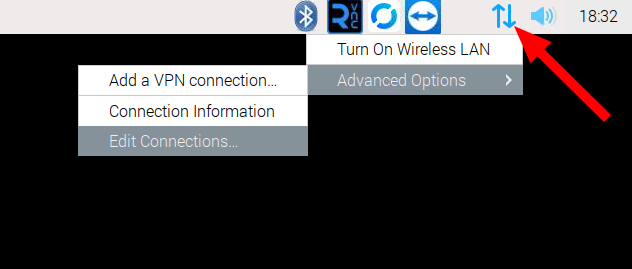
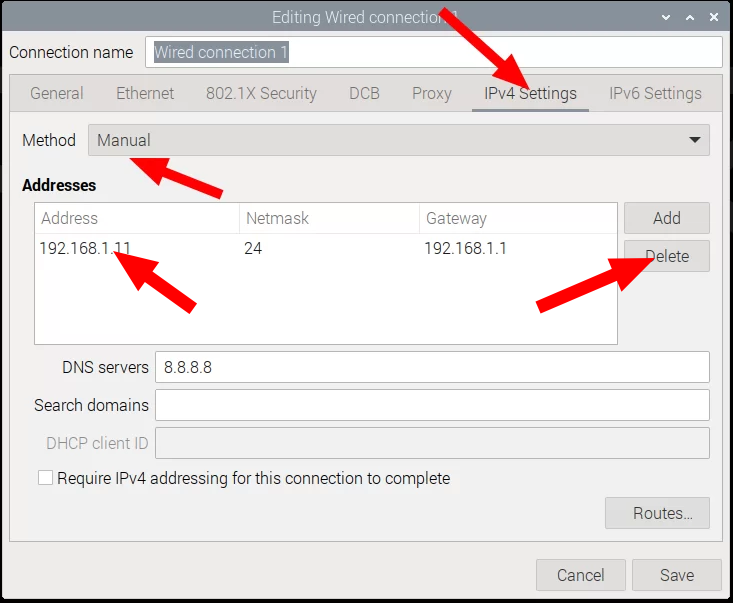
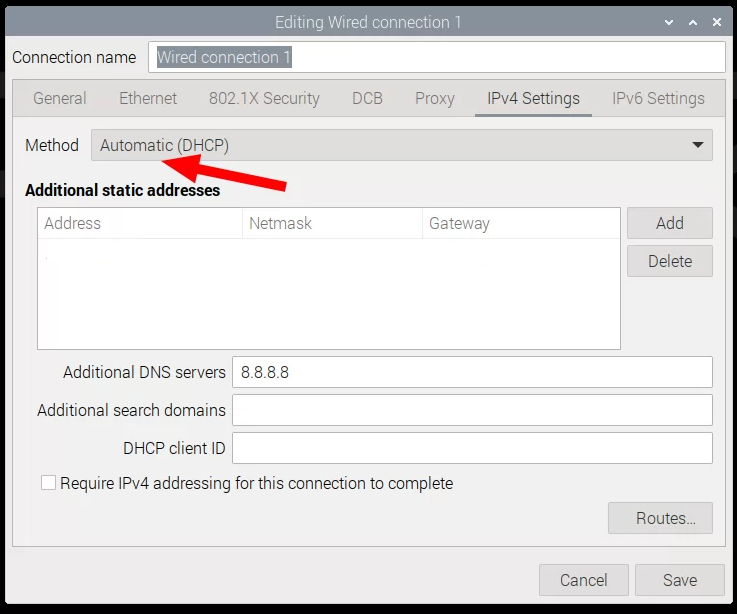
After the change is made, save the settings and restart the system.
System password
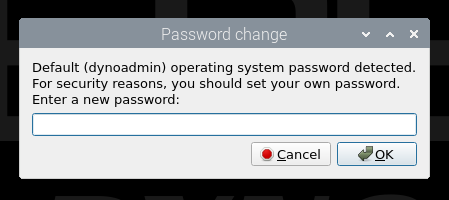
The controller is shipped with username: pi and password: dynoadmin
These credentials are among others used for connection via the SSH and VNC protocol or to install extra software in the operating system.
Root (administrator) password is not configured. To execute commands requiring root privileges, use the sudo command.
If the controller will be working on a public network, it’s advised to change the default password to avoid unauthorized access.
On first dyno software start, you will be asked to change the user password. This is the pi user system password you will be changing. Make sure you remember your new password.
Dyno2 application files and directories
All application data – settings and measurements are stored in /home/pi/.dyno2 directory.
- log/ – directory with error logs
- media/ – stores project pictures and camera recordings
- report/ – dynamometer report configuration files
- runs/ – directory with measurement data. The .h5 file contains all the run data and information needed to open it on another device.
- saved/ – default directory for data export (e.g. PDF, CSV)
- translations/ – directory with custom software translations
- analyzeVariables.xml – data channels configuration for ANALYZE tab
- canInputs.xml – CAN bus inputs configuration.
- canOutputs.xml – CAN bus outputs configuration
- functions.xml – user programmed logic functions.
- inputChannels.xml – UI input channel configuration.
- projects.db – old database file from software < 1.0.0
- projects2.db – current, more detailed database with information about projects and associated runs.
- projectsCustomization.xml – customization settings for projects database
- runsCustomization.xml – customization settings for runs database
- runVariables.xml – data channels configuration for RUN tab
- UDSChannels.xml – configuration of OBD/UDS channels
- settings.ini – file with software and dyno configuration. This file contains all the settings that are not placed in separate files or directories. It includes dyno configuration like inertia values, load cell calibration, PID tuning, and many more.
Customization for dyno manufacturer
Dyno manufacturer can place additional files in main (/home/pi/.dyno2) dyno directory to personalize the software for their product:
- branding.png – default plot background
- icon.png – application icon 32px x 32px
- appName.txt – application name for title bar
- about.txt – default text displayed in SETTINGS / About tab
- style.css – software look customization with use of CSS styles
Here you can find CSS styling documentation:
Qt Style Sheets Examples
Qt Style Sheets Reference
Keep in mind that customized styling will negatively affect user interface refresh rate and responsiveness.
Storing dyno data on removable media
Adding new system user to have two dyno setups
You may want to have two completely or partially separate setups to use one controller for two dynamometers. One way to achieve it is to create a new user in the operating system. This task need to be completed through the terminal.
First add a new user. For this example, we will use “bob” username:
sudo adduser bobAfter this command, enter all the information and new user password according to the prompts. Then add the user to all groups in which the main user pi is.
sudo adduser bob adm
sudo adduser bob dialout
sudo adduser bob cdrom
sudo adduser bob sudo
sudo adduser bob audio
sudo adduser bob video
sudo adduser bob plugdev
sudo adduser bob games
sudo adduser bob users
sudo adduser bob input
sudo adduser bob render
sudo adduser bob netdev
sudo adduser bob spi
sudo adduser bob i2c
sudo adduser bob gpio
sudo adduser bob lpadmin
sudo adduser bob usb
Next, edit /etc/sudoers file to set up the system, so the new use won’t need to enter the password every time to get administrative rights. You can use “sudo nano /etc/sudoers” for this task. Add the following new line at the end and save the file:
bob ALL=(ALL) NOPASSWD:ALLNow you can switch the user by logging out from default “pi” user and logging to your new “bob” user.
Optionally, you can change the system setting to show the login screen at every boot. Run:
sudo raspi-configThe option you want to change is located in: 1 System Options > S5 Boot / Auto Login > B3 Desktop
Now reboot the system, place the Dyno2 app on the desktop and use the new user with separate dyno setup.
Raspberry Pi bootloader recovery
If the controller is not showing up anything on the screen, one of the possibilities is that the Raspberry Pi bootloader is damaged.
Here are some guides for bootloader recovery:
Raspberry Pi 4 (DC1 series controllers)
Raspberry Pi 5 (DC2 series controllers)